Do it after watering season
Winterize the backflow preventer once you are done watering for the year. Waiting until the first hard freeze gives the weather more chances to get ahead of you.
Loading...
Freeze protection guide
Use these Treasure Valley winterization tips and printable diagrams to help protect backflow assemblies, pumps, filters, and sprinkler valves before freezing weather arrives.
The Maintenance Shop winterizes backflow preventers during sprinkler blowouts, but a sudden cold snap can arrive before your scheduled appointment. Preparing the backflow preventer yourself after the watering season can reduce the risk of a cracked device and an expensive spring repair.
Above-ground pressure vacuum breakers and reduced pressure assemblies are especially vulnerable because they are exposed to cold air. Underground sprinkler lines are often safer for longer because the ground holds warmth, but exposed backflow devices can freeze when temperatures drop into the 20s for several hours.
These tips do not replace the diagrams below, but they can help you understand what matters most before you open a full-size instruction image.
Winterize the backflow preventer once you are done watering for the year. Waiting until the first hard freeze gives the weather more chances to get ahead of you.
If water comes out when you turn a valve counter-clockwise, that is usually the drain. If it does not move water, it is usually the main. Mark the inside of the tube near the top with M and D for next time.
A poor sprinkler blowout can leave water trapped in the backflow preventer. Ask who the technician works for and whether they are licensed or work for a licensed company.
Choose the image that best matches your device. Each picture opens as a full-size image in a new tab so you can save it or print it and keep the instructions near your sprinkler timer.

Common above-ground sprinkler backflow device found throughout the Treasure Valley.

Often installed below ground on older sprinkler systems and still important to prepare correctly.
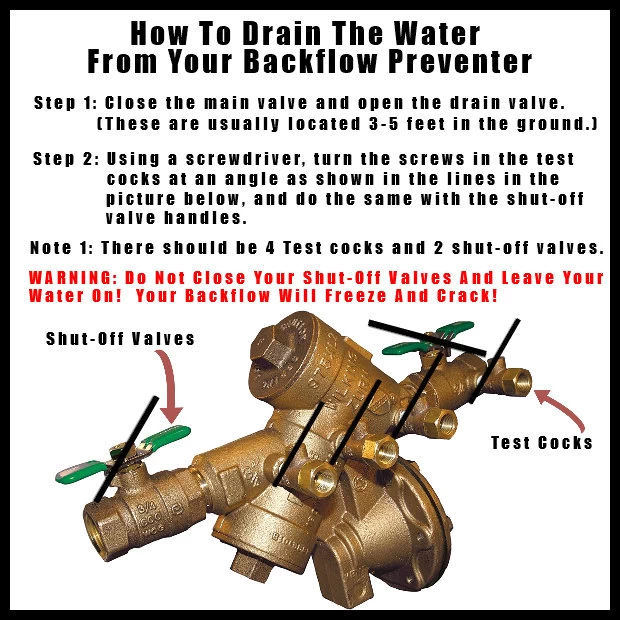
An above-ground backflow assembly that should be protected before freezing weather arrives.
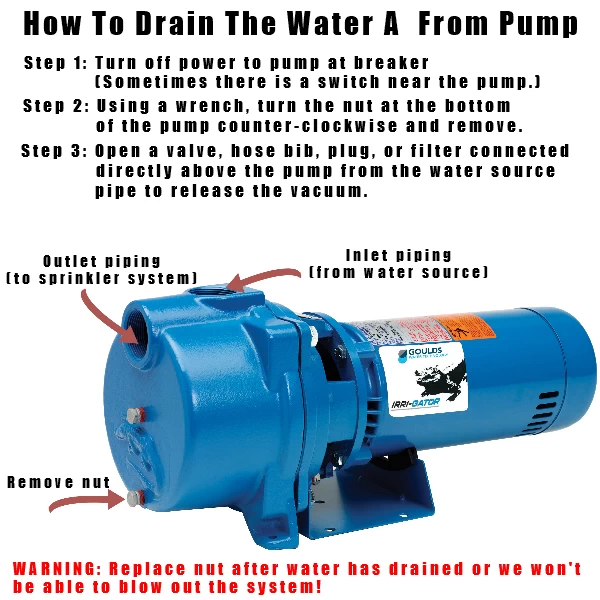
Helpful for irrigation systems that use a pump and need additional seasonal protection.
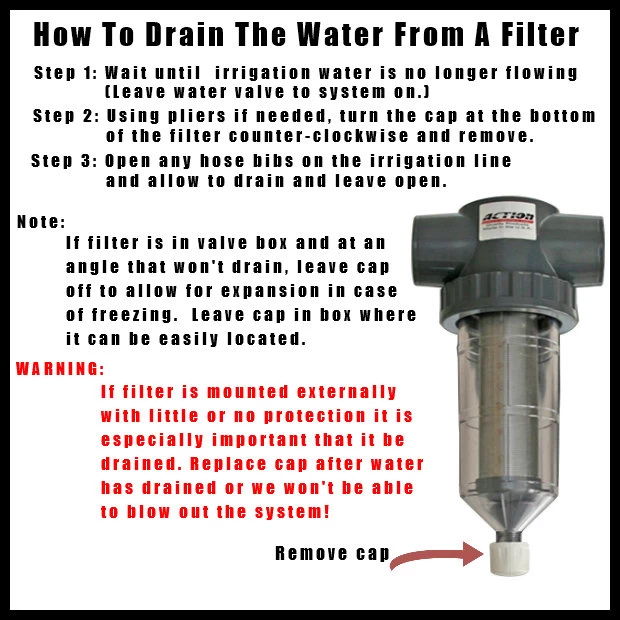
Use this diagram if your sprinkler system has an irrigation filter that needs to be drained.
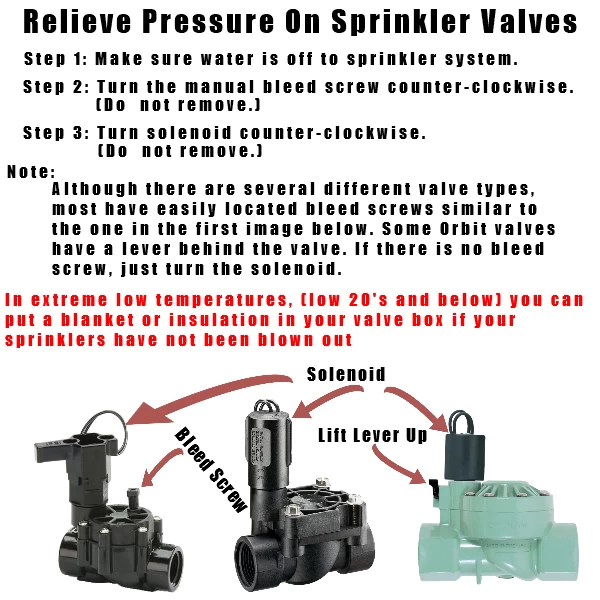
Use this guide to help relieve trapped pressure from electronic sprinkler valves.
If you do not know the difference between the main and drain valves, try turning one valve counter-clockwise. If water starts coming out or filling the pipe in the ground, it is the drain. If it does not move water, it is usually the main.
We handle backflow testing, repair, replacement, and installation throughout the Treasure Valley.